Converting to ASyncDisplayKit
Feb 07, 2016
Plug and Play on ASDK
I had been fascinated with AsyncDisplayKit for a while now ever since I heard of the concept:
AsyncDisplayKit is an iOS framework that keeps even the most complex user interfaces smooth and responsive … To keep its user interface smooth and responsive, your app should render at 60 frames per second — the gold standard on iOS. This means the main thread has one-sixtieth of a second to push each frame. That’s 16 milliseconds to execute all layout and drawing code! And because of system overhead, your code usually has less than ten milliseconds to run before it causes a frame drop.
AsyncDisplayKit lets you move image decoding, text sizing and rendering, and other expensive UI operations off the main thread
I worked with UITableViews extensively when I was creating my most recent published application - HakkerJobs but was not fully satisfied with the result. The original application had a hanging, “please wait” rotating item that floated on the screen while the app was busy downloading the data. As it did that, I locked user interaction with the table. It was not the best user experience and I did not enjoy working with it. ASDK seemed like a good solution.
The first time I took a crack at it though did not go well. I did not know how ASDK worked and could not get the application to run. I got as far as replacing some of the required UITableView delegate methods with the ASTable (ASDK’s version of UITableView) and subclassing ASCellNode (which is the ASDK version of UITableViewCell). Chastened, I deleted my ASDK branch from the project.
After a few more applications, I decided that I would pursue the matter again. I was working on a Reddit client and really wanted to make ASDK work this time. I watched a few videos and I think that got me to a better place. This one in particular was very helpful. Once someone had explained it to me, then I grasped the challenge better.
ASDK (As I Understand It)
ASDK exists because the standard SDK for building UI elements (UIKit) generates those elements on what is called the “main thread” instead of a “background thread” - these threads are possible because iPhones today have multiple cores. This is inefficient because processing things on the main thread blocks other processes. The result is that the consumer-facing interface drops frames and looks laggy.
ASDK introduces the concept of the “node”, which sounds super fancy but really is just another NSObject that wraps a standard UIKit element (see the diagram below).

The benefits of this is that the background thread decodes and sets up a whole bunch of cool things without stressing out your interface. This is a new and weird approach which means that there is a whole lot of things that you have to do differently from initiating a standard UITableView. With that being said, if you are familiar with it then switching from UITable to ASTable could be as easy as a drop-in replacement.
The Code - ASTable
I had two tabs in the app that I would have liked to switch out - there are more but we shall save those for later. They were UITableViewControllers. Being UITableViewControllers mean that they have three crucial delegate functions:
override func tableView(tableView: UITableView, cellForRowAtIndexPath indexPath: NSIndexPath) -> UITableViewCell

func tableView(tableView: UITableView, numberOfRowsInSection section: Int) -> Int

func numberOfSectionsInTableView(tableView: UITableView) -> Int
Swapping in an ASTableView (other than instantiating it and placing it in the view) is pretty easy actually. UITableViews are simply instantiated and added to the subview (you don’t need to invoke addSubview because if you are working with a UITableViewController, in which you can simply called tableView). However there are other things needed to get the right look:
    self.tableView.delegate = self
    self.tableView.dataSource = self
    self.tableView.registerClass(JobViewCell.self, forCellReuseIdentifier: "Cell")
    self.tableView.rowHeight = UITableViewAutomaticDimension
    self.tableView.estimatedRowHeight = 400.0
The first two lines help the VC understand where to go for information to figure its behavior and its data. The Delegate helps define behaviors (what happens if they touch a cell for example) while the DataSource helps define what info shows up (what info does the cell show, etc). The third line is to tell the tableView what cell they should expect to use (using an identifier called the reuseIdentifier). The fourth and fifth are so I can get the right positioning of UIKit elements (mostly UILabels) within the cell.
This was replaced. I turned the UITableViewController into a normal UIViewController, instantiated a ASTableView, and added it to the subview.
    jobsTableView = ASTableView(frame: view.frame, style: UITableViewStyle.Plain, asyncDataFetching: true)
    view.addSubview(jobsTableView)
    jobsTableView.asyncDataSource = self
    jobsTableView.asyncDelegate = self
New names for the functions but the concept is the same. I tell ASDK that I want a ASTable with async data fetching capability enabled. Then I give it itself as an asyncDatasource and delegate (previous hangups I had was that I wasn’t using asyncDatasource and asyncDelegate but instead regular delegate and datasource and also that I was not subclassing the ASTableDelegate and ASTableDataSource classes).
Required delegate methods are next.
The Code - DataSource and Delegate Methods
To get a barebones UITableView going, you need to fill in two methods, coming from the datasource that you want to display. The first one below
func tableView(tableView: UITableView, numberOfRowsInSection section: Int) -> Int
This is an Objective-C function but easy to read even if you are coming from Swift. “func” means that this is a function. “tableView” means that it refers the UITableView and then within the paratheses it takes two variables - a reference to the tableView object itself (referred to as ‘tableView’) and a reference to the section. A tableView is divided into sections and then within each section are rows. This function simply tells the table how many rows it should draw within a section.
The part that goes “-> Int” means that you have to return with an Int.
This required datasource function does not change when we swapped out the TableView with the ASTableView. For me it was the number of jobstory items that have been downloaded from the HackerNews source.
The second required data method that you need to override is the below:
override func tableView(tableView: UITableView, cellForRowAtIndexPath indexPath: NSIndexPath) -> UITableViewCell
Let me walk you through this particular function. The NSIndexPath is sort of like a coordinate system for the table. It is made out of two components - the Section (indexPath.section) and the row within the section (if there is only 1 section), indexPath.row. Within this function you initiate a UITableViewCell (you don’t usually instantiate a brand new one, you let iOS do this nifty reuse trick where it recycles cells that vanish off screen, identifying with the “reuse identifier” that I mentioned earlier in this piece) and then you configure it with the information that you want to set it up with.
This one has to be replaced with:
func tableView(tableView: ASTableView, nodeForRowAtIndexPath indexPath: NSIndexPath) -> ASCellNode
You can see that is pretty similar and for the most part it is. You instantiate a Node and then configure it with the particulars that you want it to eventually display. One thing in particular that is interesting is that you do not reuse the node like you do with the view cell.
func tableView(tableView: UITableView, didSelectRowAtIndexPath indexPath: NSIndexPath)
The only super important delegate method did require any change. This one dictates the behavior of the table once someone actually taps on a cell. I was surprised that I would not be required to make any change to the code here.
I was surprised that this worked out so well - and so little was actually required to set up. However now comes the tough one: the custom cells.
The Code - Custom Nodes
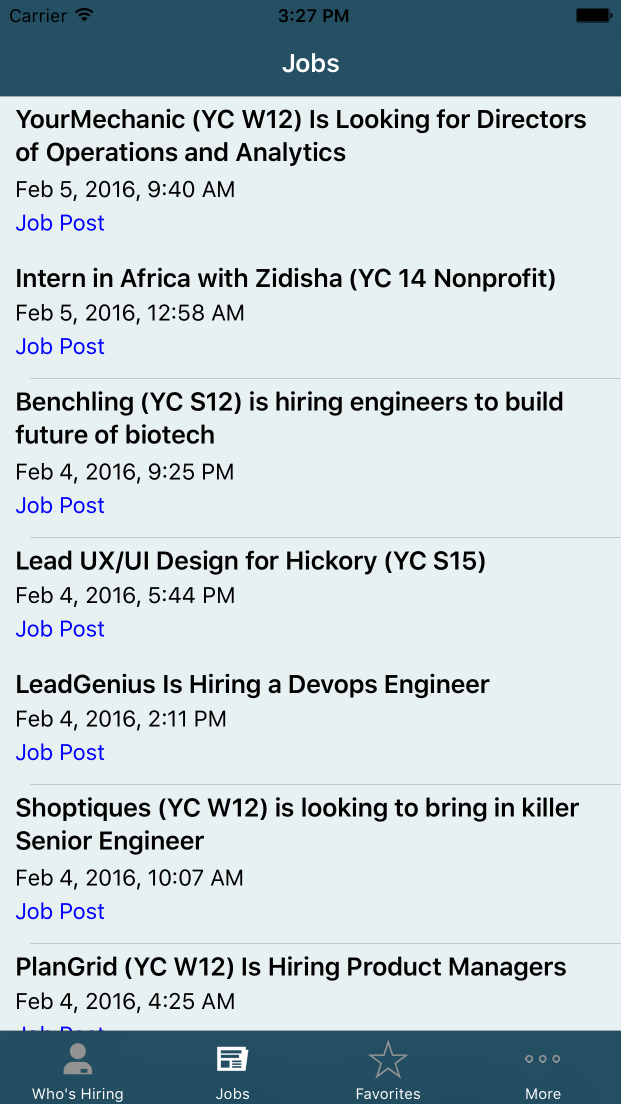
It is rare that the out-of-the-box ASTableNode works for your purposes. Instead you have to subclass it and create your own custom NodeCell. This turned out to be easy. In the creation of the first iteration of HakkerJobs, there are tables populated with a custom cell I created. This cell is used throughout the entire app in various different functions. They look like the screenshot below.

This seems complicated but turned out to be relatively easy to replicate. Each cell had only three sets of information that it needed to display: The Title, the date of the job, and a classification label. I created a custom init function that took in an individual job listing (an Item) and then passed that Item to a worker function.
class ASJobsCell: ASCellNode {
    var titleNode: ASTextNode
    var dateNode: ASTextNode
    var typeNode: ASTextNode

    init!(item: Item) {
        titleNode = ASTextNode()
        dateNode = ASTextNode()
        typeNode = ASTextNode()

        super.init()
        setupSubNodesWithItem(item)
    }
}
Within the setupSubNodesWithItem function we have this:
func setupSubNodesWithItem(item: Item) {
    titleNode.attributedString = NSAttributedString(string: item.title, attributes: [
        NSFontAttributeName: UIFont.preferredFontForTextStyle(UIFontTextStyleHeadline)
        ])
    titleNode.placeholderColor = UIColor.blackColor()

    dateNode.attributedString = NSAttributedString(string: UIFactory.createDateFormatter().stringFromDate(item.time), attributes: [
        NSFontAttributeName: UIFont.preferredFontForTextStyle(UIFontTextStyleSubheadline)
        ])
    typeNode.attributedString = NSAttributedString(string: item.jobType, attributes: [
        NSFontAttributeName: UIFont.preferredFontForTextStyle(UIFontTextStyleSubheadline),
        NSForegroundColorAttributeName: UIColor.blueColor()
        ])

    addSubnode(titleNode)
    addSubnode(dateNode)
    addSubnode(typeNode)
}
I was shocked a bit by how easy it was to set this up. You instantiate the component subnodes and then add them to the main CellNode. But now comes the tough part, the positioning.
The Code - ViewCells Layouts
Not going to lie. The reason there’s only one type of cell used throughout the entire app is because figuring out layout and positioning issues was a real pain in the ass even when using a helper library like SnapKit. Here is an example of the JobViewCell:
    self.titleLabel.snp_makeConstraints { (make) -> Void in
        make.top.equalTo(self.contentView).offset(5.0)
        make.left.equalTo(self.contentView).offset(10.0)
        make.right.equalTo(self.contentView).offset(-10.0)
        make.bottom.equalTo(self.dateLabel.snp_top).offset(-5.0)
    }

    self.dateLabel.snp_makeConstraints { (make) -> Void in
        make.left.right.equalTo(self.contentView).offset(10.0)
        make.bottom.equalTo(self.contentView.snp_bottom).offset(-2.0)
        make.height.equalTo(20.0)
    }

    self.accessoryBadge.snp_makeConstraints { (make) -> Void in
        make.bottom.equalTo(self.contentView).offset(-5.0)
        make.right.equalTo(self.contentView).offset(-10.0)
    }
This is a pain in the butt because that code is just for positioning. I gotta style it too with the proper font and color settings.
Because ASDK offloads a lot of the expensive layout and positioning calculations to the background thread, a lot of this code becomes useable. Instead, the developers of ASDK have this fangled thing called LayoutSpecs, which appear to be sort of like blueprints that use flex box css lingo. After subclassing ASNodeCell - ASDK’s version of the UITableViewCell - I overrode this specific delegate function and wrapped the individual TextNodes in LayoutSpecs that give broad guidelines as to how the cell is going to look.
override func layoutSpecThatFits(constrainedSize: ASSizeRange) -> ASLayoutSpec {
    let verticalNodeStack = ASStackLayoutSpec(direction: ASStackLayoutDirection.Vertical, spacing: 8.0, justifyContent: ASStackLayoutJustifyContent.End, alignItems: ASStackLayoutAlignItems.BaselineFirst, children: [titleNode, dateNode, typeNode])

    return ASInsetLayoutSpec(insets: UIEdgeInsets(top: 5.0, left: 10.0, bottom: 5.0, right: 10.0), child: verticalNodeStack)
}
I instantiated the verticalNodeStack, the ASStackLayoutSpec that wraps the raw elements (the titleNode, the dateNode, and the typeNode) together. It specifies the direction of the layout (vertical down) and the spacing in between the elements. Then you wrap the whole thing in an InsetLayout spec so that you get some spacing. That gets returned to the function.
Conclusion
There is still a lot more to do and this blog is long enough. I am surprised all in all that writing this post took longer than the actual changes that I have made. But in conclusion, ASDK for the Table requires you to think differently about how UITableViews work but it is now a lot simpler and ready for a smoother user experience.
If you are curious as to how the final product looks: